After you’ve started using WordPress, one of the first things you should learn is how to install a WordPress plugin.
Simply put, WordPress plugins act like apps for your website. They allow you to add different functions to your WordPress site, such as a contact form, slideshow, shopping cart, and more.
A multitude of both free and premium plugins are at your disposal for WordPress. In this comprehensive guide, we will walk you through the process of installing a WordPress plugin, enabling you to enhance your website with diverse functionalities.
Before We Start
Before commencing the plugin installation process, it’s essential to note that if you’re utilizing WordPress.com, plugin installation is not an option.
Frequently, users encounter difficulties in locating the plugins menu within their WordPress dashboard and express concerns. This issue arises due to the usage of WordPress.com, which comes with inherent limitations.
Installing plugins on WordPress.com is only possible if you upgrade to their business plan. Conversely, self-hosted WordPress.org websites provide the flexibility to install any desired plugin right from the start.
Now, let’s delve into the steps for installing a WordPress plugin on your website.
How to Install a Plugin in WordPress
We’ve gone through three ways to add a WordPress plugin:
- Using the search function
- Uploading a plugin
- Manually installing one with FTP
Ready to begin? Let’s get started.
Install a Plugin using WordPress Plugin Repository
The simplest method to install a WordPress plugin is by using the plugin search. However, keep in mind that this only works for plugins available in the WordPress plugin directory, and these are usually free.
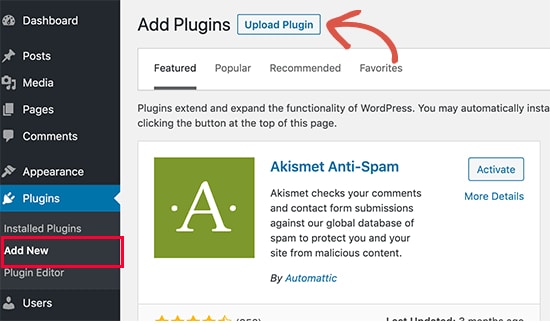
To start, go to the “Plugins” and then “Add New” page in your WordPress admin area.
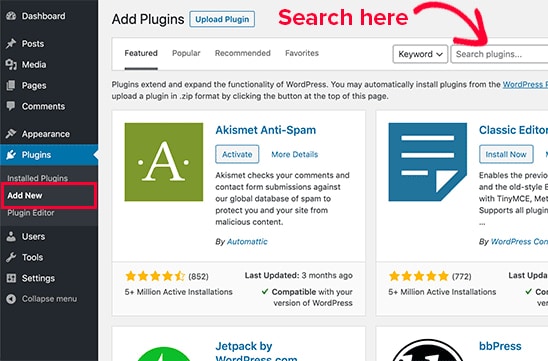
On the page that appears, you’ll see a layout similar to the screenshot above. To locate the plugin you want, either type its name or describe the functionality you need. Following that, you’ll see a list of options, as shown in the example below:
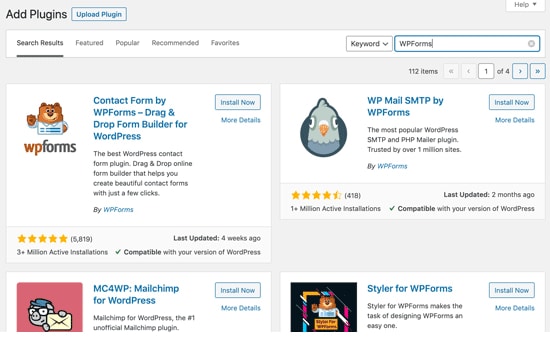
Choose the plugin that suits your needs. For instance, if you were searching for WPForms, the top WordPress contact form plugin, click on the ‘Install Now‘ button beside it.
WordPress will then proceed to download and install the plugin. Once completed, the ‘Install Now‘ button will transform into an ‘Activate‘ button.
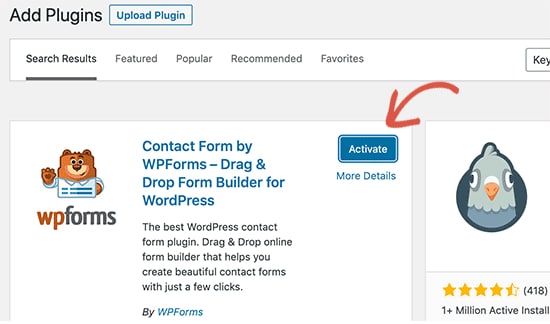
After installing a WordPress plugin on your site, it won’t function until you activate it. Simply click on the “Activate” button to begin using the plugin on your WordPress site.
Congratulations! You have successfully installed your first WordPress plugin.
The next step involves configuring the plugin settings. Keep in mind that these settings will be different for each plugin, so we won’t be covering that in this post.
Install a Plugin using Admin Plugin Upload in WordPress
Unlike free plugins, paid WordPress plugins are not found in the WordPress plugin directory. As a result, you can’t install them using the first method mentioned.
WordPress has a solution for this, allowing you to use the upload method for installing such plugins. Here’s how to do it: First, download the plugin from the source, usually in the form of a zip file. Then, go to your WordPress admin area and navigate to the “Plugins” and “Add New” page.
Once there, click on the ‘Upload Plugin‘ button located at the top of the page.
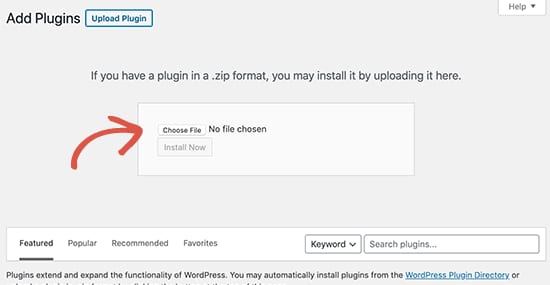
Now, you’ll see a form for uploading the plugin. Simply click on the ‘Choose File‘ button, and pick the plugin file you downloaded to your computer earlier.
Once you’ve selected the file, click on on the ‘Install Now’ button. WordPress will then upload the plugin file from your computer and install it automatically. After the installation is complete, you’ll see a success message like the one shown here.
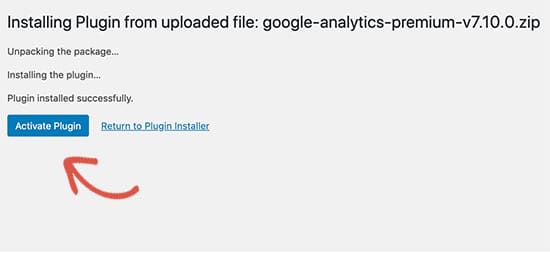
After installation, click on the “Activate Plugin” link to begin using the plugin on your site.
To tailor the plugin to your requirements, you’ll need to adjust the settings. Keep in mind that these settings differ for each plugin, so we won’t be discussing them in this post.
Manually Install a WordPress Plugin using FTP
In rare instances, your WordPress hosting provider might have restrictions that prevent you from installing a plugin through the admin area. If that happens, you can manually install the plugin using FTP.
However, the FTP method is less beginner-friendly.
- Download the Plugin: Get the plugin’s source file, usually in the form of a zip file, and download it to your computer.
- Unzip the File: Unzip the downloaded file on your computer. This action creates a new folder with the same name as the zip file.
- FTP Credentials: Obtain your FTP username and password. If you don’t have this information, reach out to your WordPress hosting provider for assistance.
- Open FTP Client: Launch your FTP client on your computer.
- Connect to Website: Use the provided FTP login credentials to connect to your website.
- Navigate to Plugins Folder: Once connected, locate and go to the /wp-content/plugins/ folder on your website.
- Upload Plugin Folder: Upload the folder you extracted from the zip file to the /wp-content/plugins/ folder on your web server.
By following these steps, you can manually install a WordPress plugin using FTP, even in cases where restrictions exist in the admin area.
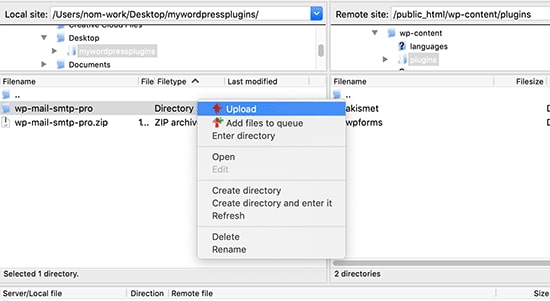
Once you’ve uploaded the files, go to the WordPress admin area and click on the “Plugins” link in the admin menu. You’ll then see your plugin successfully installed on the plugins page.
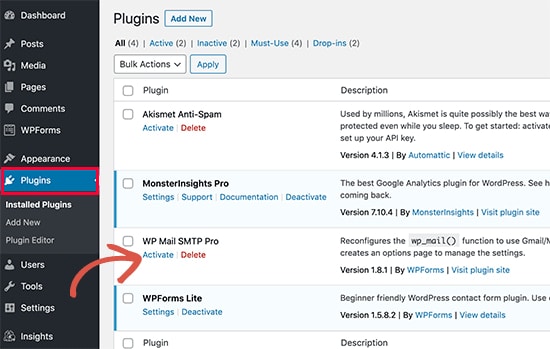
Click on the “Activate” link below the plugin to begin using it.
After activation, you might need to adjust the plugin settings. Keep in mind that each WordPress plugin has its own unique settings, and we won’t go into detail about them here.
FAQs
As a beginner, you might have some questions about how to install WordPress plugins. As a leading WordPress resource site, we’ve heard and answered many of them. Here are some of the most common questions:
How do I find the best WordPress plugins for my website?
With over 55,000 plugins in the free WordPress plugin directory and many more as premium options, it can be challenging for beginners to discover the right plugin for their needs. We’ve created a list of essential WordPress plugins that most websites find useful.
What’s the difference between installed and active plugins?
Just installing a plugin doesn’t mean it’s in use on your site. To utilize a plugin, you must ‘Activate‘ it. You can check your active plugins by visiting the ‘Plugins‘ page in the WordPress admin area, where they will be highlighted with a blue background.
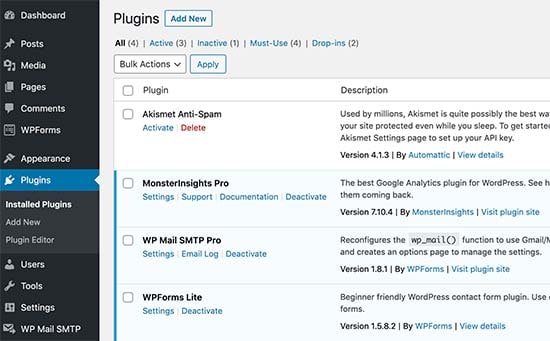
Plugins with a white background on the page are installed on your website but not actively in use.
Should I delete inactive plugins?
If you’re not using a plugin, it’s a good idea to delete it from your website.
How many plugins can I install in WordPress?
You can set up as many WordPress plugins as you need. The number doesn’t impact your website speed; it’s the quality of the plugins that matters.
How do I uninstall a WordPress plugin?
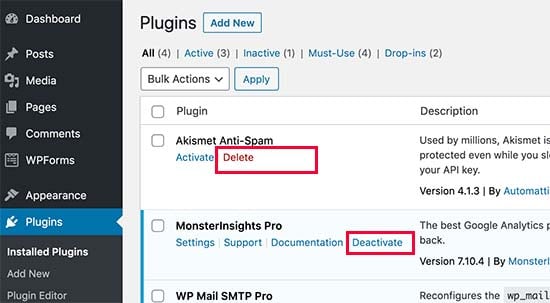
To remove a WordPress plugin, go to the Plugins page in the WordPress admin area. If the plugin is currently active, deactivate it first. Afterward, click on the delete link to remove it from your website.
Sum Up
In summary, mastering the installation of WordPress plugins is crucial for beginners seeking to enhance their websites. This comprehensive guide covers various methods, from the straightforward plugin search to the more advanced FTP installation. It’s important to note the limitations on WordPress.com and the flexibility of self-hosted WordPress.org.
The article not only provides step-by-step instructions but also addresses common questions about plugins. It emphasizes the importance of quality over quantity when it comes to the number of plugins. Overall, this guide serves as a valuable resource for users looking to optimize their WordPress experience through effective plugin usage.


